I finally had a chance to wire up my heated grips over the weekend in preparation for some fall and winter riding. I didn't want to just wire up the heaters directly to the battery. This could be disastrous if I leave the heaters switched on after I shut down the bike. It can kill the battery. I need something that will automatically cutoff the power to the heaters when I shut down the bike.
What I need is a relay. A relay is an elegant device. It is basically a switch that is turned on by a magnet. The magnet is really a coil that gets magnetized when current passess through it. To make it work, I would have to connect the coil to a power source that is only on when the motorcycle is running. One may ask, why not just connect your device to the circuit that you would use to trigger the relay? That is a good question. However, you can't simply connect your accessory directly because the load that you are putting on that circuit may be more than what that circuit can handle.
I also wanted provide power to other accessories and any future additions. Something of a power hub. A fuse block can be used to distribute power independently to any accessory. Each fuse port will carry 12V+ to any accessory I choose. The nice thing about a fuse block is that I can easily put in any fuse I want in the circuit.
The following is a simple diagram of what I ended up doing. Notice that I am only using two fuse ports. One for the heat grips, the other to a cigarette lighter socket. The other two can be wired later to power new accessories.
The materials for this project is fairly cheap. The relay cost around $6 from Radio Shack. The Fuse Block is around another $6 from Pep Boys. The wiring is actually one of the most expensive items if you are tackling this project. I didn't have to buy any since I have some from another project. The other items to get that can make this project professional looking are heat shrink tubing and weather-proof connectors. This could run you another $12-$15. To mount the fuse block, I screwed it down into the chassis using self-tapping metal screws after drilling pilot holes. I had screws already so this too I didn't have to buy. You'll need a voltmeter to test for a switched +12V circuit. You'll also need a soldering iron to connect a splice into the switched +12V circuit.
To relay has four terminals. Two for the coil and another two for the switch. The Radio Shack relay (SKU 275-0001) are labeled 86 and 85 for the coil terminals, 87 and 30 for the switch. Connect one of the coil terminals to ground and the other into the switched +12V circuit, and the other to ground (chassis of the motorcycle). Wire one side of the switch terminals directly to the battery positive (+) terminal and the other side into the fuse block's common terminal. Wire each accessory to an independent terminal and connect it on the other side of the fuse block. Finally, add appropriate fuses for each circuit you enable.
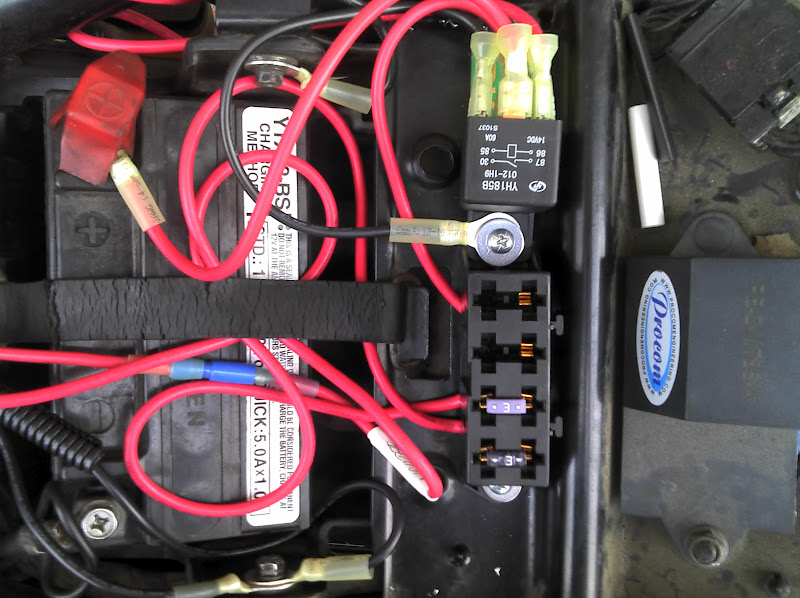
On my Bonneville, I mounted everything just above the battery housing. Below is a photo of the final installation. The relay is on top of the photo. The fuse block is directly below it. Noticed the two 3A fuses on the fuse block indicating that I am powering two accessories.
What I need is a relay. A relay is an elegant device. It is basically a switch that is turned on by a magnet. The magnet is really a coil that gets magnetized when current passess through it. To make it work, I would have to connect the coil to a power source that is only on when the motorcycle is running. One may ask, why not just connect your device to the circuit that you would use to trigger the relay? That is a good question. However, you can't simply connect your accessory directly because the load that you are putting on that circuit may be more than what that circuit can handle.
I also wanted provide power to other accessories and any future additions. Something of a power hub. A fuse block can be used to distribute power independently to any accessory. Each fuse port will carry 12V+ to any accessory I choose. The nice thing about a fuse block is that I can easily put in any fuse I want in the circuit.
The following is a simple diagram of what I ended up doing. Notice that I am only using two fuse ports. One for the heat grips, the other to a cigarette lighter socket. The other two can be wired later to power new accessories.
 |
| 12V Power Hub |
To relay has four terminals. Two for the coil and another two for the switch. The Radio Shack relay (SKU 275-0001) are labeled 86 and 85 for the coil terminals, 87 and 30 for the switch. Connect one of the coil terminals to ground and the other into the switched +12V circuit, and the other to ground (chassis of the motorcycle). Wire one side of the switch terminals directly to the battery positive (+) terminal and the other side into the fuse block's common terminal. Wire each accessory to an independent terminal and connect it on the other side of the fuse block. Finally, add appropriate fuses for each circuit you enable.
On my Bonneville, I mounted everything just above the battery housing. Below is a photo of the final installation. The relay is on top of the photo. The fuse block is directly below it. Noticed the two 3A fuses on the fuse block indicating that I am powering two accessories.
 |
| Power Hub Fully Assembled With Relay Just Above Fuse Block |
 |
| Close up of Relay Terminals |
I found a switched circuit in a bundle of wires located inside the right hand side cover. I am not sure what its connected to but its a Green/Red wire. The photo below shows how I spliced and solder the wire connected to the relay's coil. I wrapped the splice with electrical tape afterwards.
 |
| Red Wire from Relay Coil Spliced into Green/Red Switched +12V Circuit |
Comments
Post a Comment